It's been so long since I've posted here, I might as well close it down.
Maybe I'll add an autocad trick or two just to get back into the swing of things.
Right now the Superbowl is on, so I'll think something up tomorrow at work and put it in.
Go Steelers!
Sunday, February 1, 2009
Monday, December 24, 2007
Image frames
Here's a nifty tip I've stumbled across during my continuous exploration of Autocad: IMAGEFRAME=2
I've skipped from 2005 straight to 2008, so I don't know if this is in '06 or '07, BUT ... it's a great tip in '08.
The IMAGEFRAME system variable, or IMF (my pgp shortcut), used to only have two settings: "On" and "Off". Well now it has three ... but they're numbered (0, 1, 2)
0 = Off
1 = On and plots the frame
and now the zinger:
2 = On and DOESN'T plot the frame
I LOVE this! Now I can easily move images if I need to without having to take the extra step(s) of finding out whether the frame is on, turning it on and then turning it off again so it doesn't plot (if you remember that step BEFORE plotting, that is).
So remember: IMAGEFRAME = 2, and just leave it alone.
Merry Christmas!
John
Wednesday, November 28, 2007
Getting Excel into AutoCAD
There are many times when it is necessary to import spreadsheet data into AutoCAD. This is easily accomplished with the standard Windows tools CUT and PASTE. However there are limitations to the quality of the inserted data. The OLE insertion is neither editable nor linkable (correction: it IS linkable, see comments). The technique in this write-up allows for both.
1. Create Excel file as you normally would.
2. Select the rows, columns and cells that you want to insert into your AutoCAD drawing.
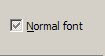
3. Right-click and select Format Cells. In the FONT tab, ensure that the “Normal Font” box is checked solid (not grayed out). See Figure 1.
Note: If you intend to keep the original Excel spreadsheet format, do NOT save the spreadsheet after this step.
7. Choose “AutoCAD Entities” (Figure 3)
8. The only thing that needs to be done is to apply the Title and Header properties. This is easily done with the following steps:
Create a new temporary table.
Activate the Title or Header cell.
Right-click and select Match Cell.
Click appropriate cell in inserted table.
Delete temporary table
CUT and PASTE SPECIAL
1. Create Excel file as you normally would.
2. Select the rows, columns and cells that you want to insert into your AutoCAD drawing.
3. Right-click and select Format Cells. In the FONT tab, ensure that the “Normal Font” box is checked solid (not grayed out). See Figure 1.

Correct way
Incorrect way
Figure 1: Format Cells
4. Click OK and then copy selection (right-click > Copy or CTRL-C)
5. In AutoCAD, if not already done, set up your TABLE per standards. This includes text style, height, color and alignment. Column and row settings do not matter, as this technique allows for small or large spreadsheets.
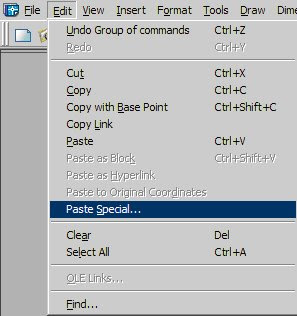
6. Select Edit > Paste Special. (Figure 2)
Figure 2
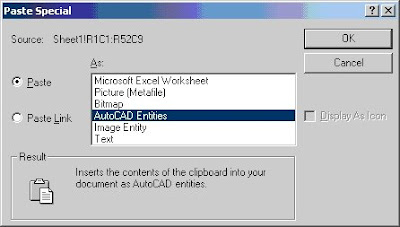
7. Choose “AutoCAD Entities” (Figure 3)
Figure 3: The Paste Special Dialog Box
8. The only thing that needs to be done is to apply the Title and Header properties. This is easily done with the following steps:
Tuesday, November 27, 2007
The TEXTTOFRONT command
This command is basically DRAW ORDER for text. And the beauty is that it works for ALL text at the same time PLUS it has an option for dimensions as well! No more hunting. :)
Give it a try.
*Added tip: Change your pgp file to make this command TTF.
Give it a try.
*Added tip: Change your pgp file to make this command TTF.
Tuesday, October 16, 2007
Bring up layout tabs faster
This tip is especially helpful if you have large drawings with a lot of detail.
LAYOUTREGENCTL allows you to choose whether or not you regen when switching between tabs:
Controls the display behavior of how a layout acts when switching to it.
LAYOUTREGENCTL allows you to choose whether or not you regen when switching between tabs:
Controls the display behavior of how a layout acts when switching to it.
- 0 - Each time you switching to a layout tab, a regeneration occurs
- 1 - Model and the last layout tab is cached into memory
- 2 - Initial display of the tab is the only time that a regeneration occurs and any other time that the tab is activated it is read from cache
Monday, October 15, 2007
Customizing your pgp file
Let's say that this is what your AutoCAD screen looks like:

Here's mine:

 Save as a backup (acad.pgp.old or some other easy to remember title)

Here's mine:

As you can see, I only have a few toobars that I use, which gives me a lot more screen space. This is because I use my keyboard rather than toolbar buttons (a habit I suggest everyone adopts). But to make that habit more practical, I've customized my pgp file to get maximum efficiency with minimal effort.
For example, LAYWALK is now LAW. TXT2MTXT is now T2. JUSTIFYTEXT is now JT. etc, etc you get the point.
Why do this, you might ask? For one thing, it's easier to spell JUSTIFYTEXT wrong than JT. For another thing, it's a lot faster, and if you do this continually, your time will add up, to be sure.
Here's how:
Type in your desired shortkey in AutoCAD to make sure that key sequence is not in use.
Open up your pgp file.
 Save as a backup (acad.pgp.old or some other easy to remember title)
 *Scroll down to USER DEFINED COMMAND ALIASES (at bottom). This is important so you do not confuse your personal user commands with acad native commands. And, as the pgp file says, if there is already a shortkey for that command that you may have overlooked, this will take precedence, since the last command is found and used. Also, as you add more, it is easier to find the bottom than the middle :)
Now ... to the next step.
Type in your desired shortkey (JT,) be sure to add the comma.
Add a set of spaces, and then type *JUSTIFYTEXT (with the *). It should look like this:

Now, this is the step many people forget. In CAD, type REINIT. In the popup, select 'pgp file' and click OK.

You have now successfully integrated your new pgp file into AutoCAD.
Test it to see if it worked.
Enjoy the time you saved and buy yourself a pop :)
Saturday, October 13, 2007
Autocad 2008
Oh, how I love Autocad 2008! It's such a great upgrade. I've just begun playing with it, but from the screencast I've seen from Lynn Allen (seen here), I can t wait to get crackin' on it.
The multileader tool and the annotative scaling feature are the most exciting I've seen. How many times have you decided to rescale a viewport, only to dread either doing the math and scaling all your text, dims (tho the dims are solved using this tip), hatching and any other items needing scaling (blocks), or pushing everything through to paperspace, rescaling to your standard, and then pushing it back into modelspace (spoken of in an upcoming blog entry - stay tuned!). Well, annotative scaling is a snap (with some setup).
Multileaders are ONE OBJECT! No longer is it 4 leaders qlattach'ed to mtext, but rather one single group of 4 leaders and mtext. I'm happy now :)
I'm sure there's plenty more (the automated sample blocks are cool, too), and once we install this on our workstations, I'll be playing -- errr, working -- with it a lot.
Have fun cadding!
Subscribe to:
Posts (Atom)
